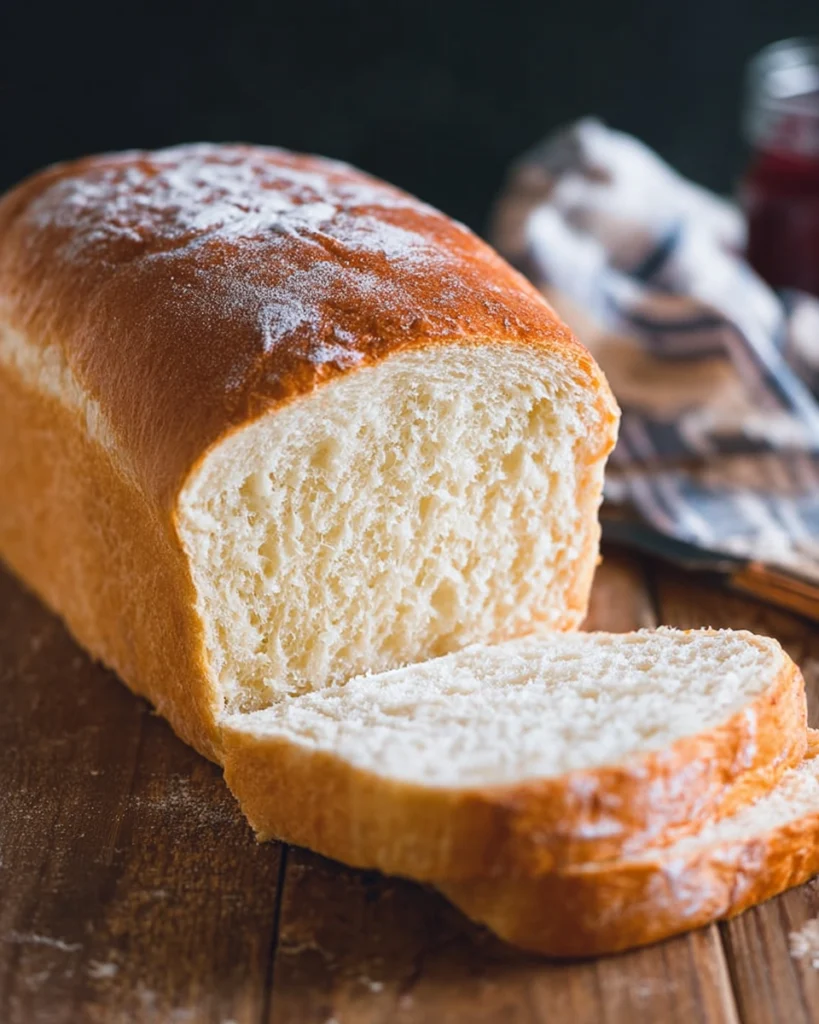
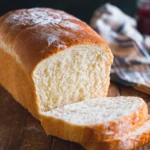
There’s something magical about the smell of freshly baked bread in your home. It takes you back to simpler times, reminding you of family gatherings and warm kitchens. Making homemade bread is more than just the end result; it’s about the joy of creating something nourishing from scratch.
In this guide, you’ll learn how to make the best white bread. It’s perfect for anyone, even if you’ve never baked before. You’ll need just a few ingredients from your pantry to make this delightful staple. Whether you’re a beginner or looking to improve, let’s explore the essential steps for a rewarding and delicious bread-baking journey. Join us as we embark on this flavorful adventure!
Key Takeaways
- Homemade bread is a wonderful way to create lasting memories.
- Understanding essential ingredients is key to crafting perfect white bread.
- Simple techniques can make bread-making accessible to beginners.
- Experiencing the aroma of baking bread enhances the joy of cooking.
- With practice, making the best white bread can become a cherished tradition.
Understanding the Basics of Bread Making
Bread making is a mix of science and art. It lets you make tasty homemade white bread. You start by mixing flour, water, yeast, and salt to make dough. This dough ferments, which adds air and flavor to the bread.

Learning the basics of bread making can make your baking better. With the right skills and ingredients, you can make a delicious loaf. For more tips, check out these homemade white bread tips.
Making bread takes patience and practice. Each step, like kneading and letting it rise, is important. Knowing this will help you make perfect bread every time.
Essential Ingredients for the Best White Bread
To make the best homemade white bread, you need to know the key ingredients. Each one is important for the bread’s taste, texture, and how it rises. Let’s dive into what makes a great loaf.
Active Dry Yeast: The Key to Rising
Active dry yeast is a must for your white bread. It makes the dough rise by creating carbon dioxide gas. When you mix it with warm water, the yeast comes to life, making your bread light and airy.
Importance of Warm Water for Activation
Warm water is key for waking up the yeast. It should be between 105°F to 115°F. Too hot water can kill the yeast, and too cold water slows down fermentation. Getting it just right is important for a perfect rise.
The Role of Sugar and Salt in Flavor
Sugar and salt make your white bread taste better. Sugar feeds the yeast and adds a hint of sweetness. Salt enhances the flavor and controls how fast the yeast works. Finding the right balance is key to a delicious homemade loaf.

| Ingredient | Function | Recommended Amount |
|---|---|---|
| Active Dry Yeast | Leavening agent for rising | 2 ¼ teaspoons |
| Warm Water | Activates yeast | 1 ½ cups |
| Sugar | Feeds yeast, adds sweetness | 2 tablespoons |
| Salt | Enhances flavor, controls fermentation | 1 teaspoon |
| Flour | Forms the dough structure | 4-5 cups |
Preparing Your Dough: Step-by-Step Guide
Making the perfect dough is key for your easy loaf of bread recipe. Knowing the steps helps you get that soft, fluffy texture we all love. Let’s explore the main steps to prepare your dough easily.
Proofing the Yeast for Perfect Rise
Begin by proofing your yeast. Mix active dry yeast with warm water and a bit of sugar. Let it sit for 5-10 minutes until it gets foamy. This step is important as it wakes up the yeast, starting your DIY loaf bread.
Mixing Ingredients for the Right Texture
After the yeast is ready, mix it with the rest of the ingredients. Use the right techniques to make a smooth, cohesive dough. The dough should feel slightly tacky but easy to handle, showing it’s well mixed.
Kneading Techniques to Develop Gluten
Kneading is essential for developing gluten, which gives your bread structure. Knead the dough on a clean surface until it’s smooth and elastic. This step makes the dough strong and helps it rise beautifully, giving you the perfect loaf.
The First Rise: Getting the Dough to Double
The first rise, or fermentation, is key for better flavor and texture in homemade bread. Start by putting the kneaded dough in a greased bowl. Then, cover it with plastic wrap or a damp cloth to stop crust formation. Let it rise in a warm, draft-free spot for about 1 to 1.5 hours.
During this time, yeast makes carbon dioxide. This makes the dough expand and become light and airy.
For homemade bread tips, the right rising conditions matter a lot. The dough needs to be at the perfect temperature for yeast to work best. If it’s cold, try placing the bowl in a turned-off oven with the light on. This creates warmth. Check the dough as it rises; it should almost double in size. This shows the yeast is working well, setting up your bread for success.
Here are some best practices for rising dough to remember:
- Ensure all ingredients are at room temperature.
- Use fresh yeast for the best results.
- Keep the rising environment warm, ideally between 75°F and 85°F.
- If the dough is rising too slowly, check the yeast’s activation or the warmth of your environment.
By following these steps, you’ll get a great first rise. This makes your final loaf taste and feel better. Enjoying this important step in breadmaking means your hard work will pay off with delicious results.
Shaping the Loaf for Optimal Baking
After the dough rises for the first time, it’s time to shape it. Shaping is key for a good-looking loaf and even baking. It turns your dough into the loaves you dream of.
Techniques for Rolling the Dough
Start by punching down the dough to get rid of air. Then, split it into two equal parts. Flatten each part into a rectangle, making sure it’s even.
Roll each piece tightly into a log. Keep the pressure even as you roll. Pinch the seams to seal them, then tuck the ends under. These steps help make a loaf that bakes evenly.
How to Place Loaves in Pans Properly
Preparing the loaf pans is important for your bread’s texture and structure. Place the loaves seam-side down in greased pans. Make sure they have enough room for the second rise.
Proper placement ensures even baking and keeps the loaf’s shape. It’s a key step for a great loaf.
The Second Rise: Final Touch for Fluffiness
The second rise is key for making second rise bread. It happens after shaping the dough and putting it in pans. This step boosts flavor and makes the bread fluffy.
Start by covering the pans with a clean towel. Let the dough rise until it’s an inch above the pan rim. This usually takes 30 to 60 minutes, depending on the room’s temperature.
While rising, the dough forms air pockets. These pockets are essential for a light texture. To check if it’s ready, look for a soft, puffy dough. It should spring back when gently tapped.
| Time | Appearance | Texture |
|---|---|---|
| 30 minutes | Puffed but not fully risen | Stil a bit dense |
| 45 minutes | About an inch above rim | Soft and airy |
| 60 minutes | Fully risen | Ready to bake! |
After the second rise, it’s time to bake your bread. This step ensures your bread turns out fluffy and delicious.
Baking: How to Achieve Golden Brown Perfection
To get that perfect golden brown crust, pay close attention to detail. The right oven temperature and baking time are key. They help your bread rise beautifully and taste great. Learning about these factors will improve your baking.
Temperature Settings and Timing
First, preheat your oven to 350°F. This ensures even heat, which is essential for success. Bake your loaves for about 30-35 minutes. Watch them closely as they turn golden brown. The smell of baking bread will fill your kitchen, signaling that your bread is almost ready!
Signs Your Bread is Perfectly Baked
To check if your bread is done, tap the top gently. A hollow sound means it’s fully baked. For more accuracy, use an instant-read thermometer. Look for a temperature between 190°F and 200°F. This ensures your bread looks and tastes great, boosting your confidence in baking.
| Test Method | Description | Results |
|---|---|---|
| Tapping the Loaf | Gently tap the top of the loaf. | Hollow sound indicates it’s baked. |
| Temperature Check | Insert an instant-read thermometer into the center. | Temperature should be between 190°F and 200°F. |
Storing and Serving Your Homemade White Bread
After your homemade white bread cools, it’s key to store it right to keep it fresh. Simple steps can help you enjoy your bread for days. Freshly baked bread is a treat, but it can lose its appeal if not stored well.
Best Practices for Storing Fresh Bread
To keep your homemade bread fresh, follow these tips:
- Wrap the bread in an airtight container or a plastic bag to stop it from drying out.
- Keep the bread at room temperature for up to 3 days for the best taste and texture.
- If you want to store it longer, freeze your bread for up to 3 months when it’s fresh.
Ideas for Using Leftover Bread
Stale bread can be repurposed in many ways. Here are some creative ideas to use up leftover bread:
- Make delicious French toast by soaking the bread in a mix of eggs and milk, then frying until golden.
- Create homemade croutons by cubing the bread, tossing it with olive oil and spices, and baking until crunchy.
- Prepare a comforting bread pudding by mixing leftover bread with eggs, milk, and your favorite sweeteners and spices.
Variations of the Best White Bread Recipe
Trying out different bread recipes can be a fun adventure. You can add new tastes or textures by using various ingredients. For example, adding herbs, spices, or small fruits can make your bread more exciting.
Creating Different Flavors and Textures
Try mixing some whole wheat flour with all-purpose flour for a healthier, nuttier taste. Remember, whole wheat absorbs more liquid, so you might need to adjust the water. For a unique taste, use different flours like rye or spelt with your white flour.
Tips for Whole Wheat Bread or Rolls
Here are some tips for making whole wheat bread or rolls:
- Balance the sweetness by adding honey or molasses.
- Ensure you knead the dough longer for better gluten development.
- Experiment with adding seeds or nuts for added texture.
Switching to whole grain flours will give your bread a richer taste and texture. Try adding different seeds like sunflower or pumpkin for a tasty twist.
Conclusion
Making homemade white bread from scratch is very rewarding. Every step, from mixing to shaping, brings you closer to a warm, golden loaf. This loaf fills your kitchen with wonderful smells.
This guide has given you the key techniques and tips to bake like a pro. As you get better, each loaf will be fluffier and tastier. You’ll impress your family and friends.
So, get your ingredients ready and start baking. With each loaf, you’ll find joy in creating something special. Happy baking, and may your bread-making adventures be fun and rewarding!
FAQ
What is the best white bread recipe for beginners?
For beginners, the best white bread recipe uses active dry yeast, warm water, sugar, salt, oil, and flour. First, proof the yeast with warm water and a bit of sugar. Then, mix in the other ingredients. After that, knead the dough and let it rise.
How long does it take to make homemade white bread?
Making homemade white bread takes about 3 to 4 hours. This includes the rising times. But, the actual time spent working on it is only 30 minutes to an hour.
Can I make white bread dough ahead of time?
Yes, you can make the dough ahead of time. After the first rise, refrigerate it for up to 24 hours. Let it come to room temperature before finishing the second rise and baking.
What makes homemade bread different from store-bought bread?
Homemade bread has fewer preservatives, making it fresher. You can also customize it with your favorite ingredients, giving it unique flavors and textures.
What is the easiest sandwich bread recipe?
An easy sandwich bread recipe uses simple ingredients like flour, yeast, salt, and sugar. Mix them together for a soft, fluffy loaf perfect for sandwiches or toast.
How can I ensure my homemade white bread rises properly?
Make sure your yeast is fresh and active. Use warm water for proofing. Place the dough in a warm, draft-free area. Proper kneading and enough rise time are also key.
What are some quick homemade bread recipes?
Quick homemade bread recipes include no-knead bread, soda bread, and cornbread. These recipes require less time and effort but are delicious.
Can I use whole wheat flour in my white bread recipe?
Yes, you can use whole wheat flour instead of all-purpose flour for a healthier option. Just remember to adjust the water slightly, as whole wheat flour absorbs more.
How should I store my homemade white bread?
Store your homemade white bread in an airtight container or plastic bag at room temperature for up to 3 days. For longer storage, freeze it for up to 3 months to keep it fresh.
Homemade White Bread
Ingredients
For the Dough
- 2 ¼ teaspoons Active Dry Yeast Leavening agent for rising
- 1 ½ cups Warm Water Activates yeast (should be 105°F to 115°F)
- 2 tablespoons Sugar Feeds yeast, adds sweetness
- 1 teaspoon Salt Enhances flavor, controls fermentation
- 4-5 cups Flour Forms the dough structure
Instructions
Preparation
- Begin by proofing your yeast. Mix active dry yeast with warm water and a bit of sugar. Let it sit for 5-10 minutes until it gets foamy.
- Mix the proofed yeast with the rest of the ingredients in a bowl until a smooth, cohesive dough forms.
- Knead the dough on a clean surface until it’s smooth and elastic, about 10 minutes.
- Place the kneaded dough in a greased bowl, cover it with plastic wrap, and let it rise in a warm spot for about 1 to 1.5 hours or until it doubles in size.
Shaping
- After the first rise, punch down the dough and split it into two equal parts. Flatten each part into a rectangle.
- Roll each piece tightly into a log, pinch the seams to seal them, and tuck the ends under.
- Place the loaves seam-side down in greased bread pans and let them rise for another 30-60 minutes.
Baking
- Preheat your oven to 350°F.
- Bake your loaves for 30-35 minutes, or until golden brown and a hollow sound is heard when tapped.