Have you ever felt the joy of freshly baked bread? The smell fills your kitchen, and the crust is golden and crunchy. The inside is soft and melts in your mouth. This recipe is perfect for you if you love homemade bread but don’t have much time.
In just one hour, you can make a delicious bread with bread flour. This homemade yeast bread recipe is easy to follow. It welcomes you into the world of baking, no matter your skill level.
Key Takeaways
- One Hour Bread is suited for beginners.
- Quick preparation time with simple ingredients.
- Results in a chewy crust and soft interior.
- Perfect for satisfying quick bread cravings.
- Utilizes easy bread with bread flour for great texture.
Introduction to One Hour Bread
Homemade bread has become very popular in recent years. Many people love the warm, comforting flavors of freshly baked bread. One hour bread is perfect for those who don’t have a lot of time to spend in the kitchen.
This quick bread recipe needs only four ingredients. You’ll enjoy the amazing aroma in your home and the fast preparation time. It’s great for making sandwiches or as a side dish. For more bread recipes, try this keto sourdough bread for a healthy option.

Ingredients You Will Need
Making this one hour bread is easy. You won’t need any special items or hard-to-find tools. Here’s what you’ll need:
- All-purpose flour
- Water
- Olive oil
- Instant dry yeast
- Salt
These simple ingredients make a beautiful bread. You might already have all-purpose flour and instant dry yeast at home. This makes the recipe a great choice for homemade bread.

Step-by-Step Preparation of One Hour Bread
Making a delicious loaf of bread in just one hour is easy with a clear recipe. Follow these simple steps to create your own homemade bread. It will surely impress your family and friends.
- Gather Your Ingredients: Start with all-purpose flour, instant yeast, salt, sugar, and warm water.
- Mix Dry Ingredients: In a large bowl or stand mixer, combine 4 cups of all-purpose flour, 2 teaspoons of instant yeast, 2 teaspoons of salt, and 1 tablespoon of sugar.
- Add Water: Gradually add 1 ½ cups of warm water while mixing. This will create a sticky dough.
- Knead the Dough: Knead the dough on a floured surface for 8-10 minutes. Or use the dough hook attachment on your mixer for 5-7 minutes. The dough should become smooth and elastic.
- First Rise: Place the kneaded dough into a bowl lightly greased with oil. Cover it with a damp cloth. Let it rise in a warm, draft-free area for 20 minutes.
- Shape the Dough: After the first rise, punch down the dough to release air. Shape it into a loaf on a floured surface.
- Second Rise: Transfer the shaped dough into a greased loaf pan. Allow it to rise for another 15 minutes.
- Preheat Oven: Preheat your oven to 425°F while the dough is rising.
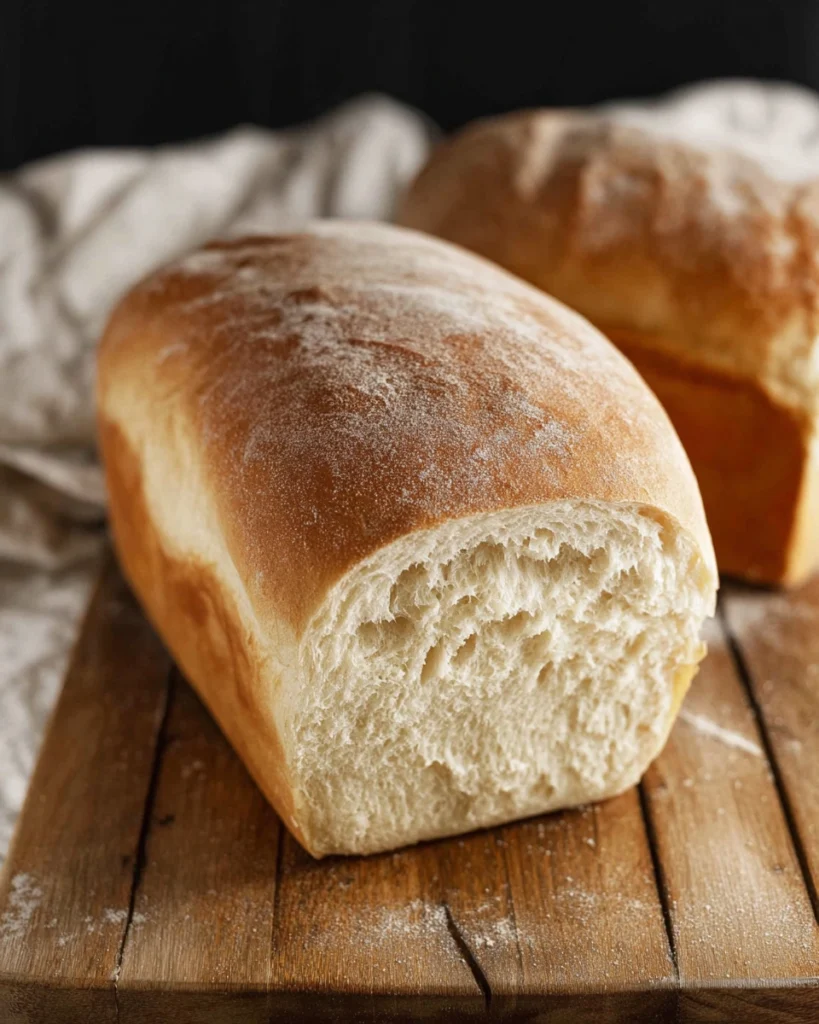
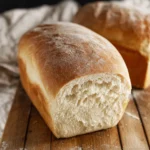
- Baking: Once the dough has risen, place the loaf in the preheated oven. Bake for 25-30 minutes until golden brown and crusty.
- Cool and Serve: Remove the bread from the oven and let it cool in the pan for a few minutes. Then, transfer it to a wire rack.
Following this step-by-step bread recipe ensures a quick and satisfying baking experience. Enjoy your homemade bread as a versatile addition to any meal!
Understanding Instant Rise Yeast
Instant rise yeast is a big help for making homemade yeast bread quickly. It doesn’t need to be activated in warm water like regular yeast. You can mix it right into your dry ingredients. This saves time and lets you start kneading dough right away.
Using instant rise yeast means your dough will rise faster. You won’t have to wait for long rising times. This is great if you’re short on time but want freshly baked bread. Instant rise yeast always gives you great results, making it perfect for instant rise yeast bread.
Knowing how instant yeast works can make baking better. When you mix it with flour and moisture, it starts working fast. This yeast helps make the bread light and fluffy.
Here’s a quick comparison of instant rise yeast and traditional yeast:
| Feature | Instant Rise Yeast | Traditional Yeast |
|---|---|---|
| Activation Requirement | No need for warm water | Requires activation in water |
| Fermentation Speed | Fast | Slower |
| Convenience | Easy to use | More steps involved |
| Best Use | Quick breads and rolls | Artisan breads |
Adding instant rise yeast to your baking can make making homemade yeast bread easy and fast. It’s a must-have for every home baker. It saves time and makes baking fun.
The Importance of Steam in Baking
In baking, steam baking is key to a perfect loaf. Steam makes the dough rise better. It also helps the crust develop fully.
To make crusty bread, use steam early in baking. Place an empty pan in the oven to preheat. Then, fill it with hot water just before adding your dough. The evaporating water creates the steam for a crispy crust.
Steam makes the bread’s outside crispy and the inside soft. This is what makes bread great. Many pros use this method, and you can too with a bit of effort.
Adding steam to your baking makes regular bread into crusty bread. Try it and see how it improves your baking.
Tips for Perfecting Your Homemade Yeast Bread
Creating the perfect quick yeast bread takes some key steps. A few tips for homemade bread can make all the difference. First, make sure your water is between 110°F and 120°F. This temperature is just right for the yeast to work without dying.
Next, mix your ingredients well for a smooth texture. Use a strong mixing bowl and spoon or a mixer. Also, watch how long it takes for your dough to rise. It should double in 30-45 minutes, but this can change based on your environment.
Don’t forget to cool your bread right. Let it rest on a wire rack to keep the bottom dry. The surface you bake on also matters. A Dutch oven can give you a crispy crust, while a loaf pan makes it softer. Try different ways to find your favorite quick yeast bread.
| Tips for Homemade Bread | Description |
|---|---|
| Water Temperature | Use water between 110°F and 120°F for optimal yeast activation. |
| Mix Ingredients Well | Thorough mixing ensures even distribution of yeast and other components. |
| Monitor Rise Time | Let the dough double in size; adjust based on environmental conditions. |
| Proper Cooling | Rest on a wire rack to maintain a good crust and texture. |
| Experiment with Baking Surface | Use a Dutch oven for a crispy crust or a loaf pan for a softer bread. |
Common Mistakes to Avoid When Baking Bread
Baking bread can be a fun experience, but many bakers face common problems. These issues can ruin your bread. Knowing these mistakes helps you make a perfect loaf every time. Here are some common problems to watch out for:
- Using the wrong type of yeast: Different yeasts have different properties. Using active dry yeast when you need instant yeast can cause texture issues.
- Overcrowding the dough: Make sure your dough has enough space to rise. Too much dough can stop it from fermenting properly.
- Incorrect oven temperatures: Baking at the wrong temperature can mess up the crust and quality. Always preheat your oven well.
- Over-kneading: Too much kneading can make your bread tough. Knowing when to stop is key for the right texture.
- Under-kneading: Not kneading enough can stop gluten from developing. This affects the rise and structure of your bread.
Knowing these common mistakes is important. It not only improves your baking skills but also makes enjoying homemade bread better.
Serving Suggestions for Your Quick Loaf Bread
Your freshly baked One Hour Bread is not just delicious on its own. It offers countless serving suggestions that can enhance any meal. From versatile sandwiches to comforting sides, the possibilities are endless. Here are some delightful homemade bread serving ideas to inspire your next meal.
- Pair with soups: A warm loaf is perfect for dipping into creamy tomato or hearty vegetable soup.
- Make sandwiches: Use your bread for classic ham and cheese or a vibrant veggie sandwich.
- Toast with toppings: Spread a layer of butter and your favorite jam for a fantastic breakfast option.
- French toast: Transform leftover bread into a delicious breakfast by making French toast with cinnamon and maple syrup.
These serving suggestions show how versatile your homemade bread is. It’s perfect for any time of day. Whether you’re preparing breakfast, lunch, or dinner, these ideas let you enjoy every crumb of your creation.
| Meal Type | Serving Ideas |
|---|---|
| Breakfast | Toast with butter and jam, French toast |
| Lunch | Sandwiches (ham and cheese, veggie) |
| Dinner | Accompany soups, serve with salads |
| Dessert | Sweet bread pudding, serve with fruit compote |
Storing Your Homemade Bread
Storing your homemade bread right is key to keeping it fresh longer. Using good bread storage tips lets you enjoy your One Hour Bread for days or weeks.
Wrapping your bread in plastic wrap is a simple trick. It stops it from drying out and keeps it from picking up fridge or pantry smells. For keeping it at room temperature, a breadbox or cloth bag is great. They let air in while keeping moisture out.
To store bread for longer, freezing is a good option. Slice the bread before freezing for easy use. Wrap slices in plastic or foil, then put them in a freezer bag or container to prevent freezer burn. When you’re ready to eat, just thaw the slices at room temperature.
By following these tips, you can keep your homemade bread fresh and tasty. Enjoy your freshly baked bread whenever you want, thanks to these easy methods.
Why Choose One Hour Bread Over Other Recipes?
The benefits of one hour bread are many and make baking easier. Today, we all want quick results without losing flavor or texture. One Hour Bread is perfect because it’s fast and easy, even for beginners.
Enjoy a fresh loaf without waiting hours. The instant rise yeast makes it rise quickly, giving you a tasty bread. It’s easy to make, so you can enjoy homemade treats anytime.
Looking for new recipes? Try the best one hour bread recipe. It’s simple and lets you make both savory and sweet breads. You’ll get a moist, tasty loaf every time.
Choosing One Hour Bread means you get to enjoy baking without spending all day. It has great flavor and texture, all in less time. It’s perfect for those who are always busy.
Want to try something different? Check out the best keto almond flour bread recipe. There are many quick bread options to explore.
Conclusion
Making one hour bread is easy and rewarding. It uses instant rise yeast and a simple method. This means you can have fresh, homemade bread in no time.
Just a few ingredients are needed to make a tasty loaf. Your kitchen will smell amazing.
Keep the tips in mind for the best results. Don’t be afraid to try new flavors and add-ins. The process is easy and fun, perfect for all bakers.
So, put on your apron and start baking one hour bread. There’s nothing like the taste and feel of bread you make yourself. Pulling that golden loaf out of the oven is a special experience.
FAQ
What is One Hour Bread?
One Hour Bread is a quick recipe. It lets you bake a delicious loaf in just one hour. It’s great for beginners or those with busy schedules.
What ingredients do I need for this bread recipe?
You’ll need flour, water, olive oil, instant dry yeast, and salt. These are common items found in most kitchens.
How do I prepare One Hour Bread?
First, mix the dry ingredients. Then, knead the dough until it’s smooth. Let it rise in a warm, draft-free area. Bake it in a preheated oven at 425°F for a crusty loaf.
What is the benefit of using instant rise yeast?
Instant rise yeast can be mixed with dry ingredients. This makes bread preparation faster than traditional yeast. It’s perfect for quick recipes like One Hour Bread.
Why is steam important in the baking process?
Steam makes the crust chewy and enhances the bread’s rise. To create steam, place an empty pan in the oven and fill it with hot water before baking.
What tips can help me achieve the perfect loaf?
Use the right water temperature and mix ingredients well. Monitor rising times and cool your bread properly for the best results.
What are some common mistakes to avoid when making bread?
Avoid using the wrong yeast, overcrowding the dough, and incorrect oven temperatures. Be careful with kneading to avoid texture issues.
How should I serve my One Hour Bread?
Serve it with soups, sandwiches, or enjoy with butter and jam. It’s great for breakfast or dessert, like French toast!
How do I store my homemade bread to keep it fresh?
Wrap it in plastic wrap and store at room temperature. For longer storage, freeze it. This way, it stays fresh for whenever you want a slice.
What are the advantages of making One Hour Bread over traditional recipes?
One Hour Bread is quick and easy. It’s perfect for beginners. You’ll enjoy homemade bread without a long commitment.
One Hour Bread
Ingredients
Main Ingredients
- 4 cups All-purpose flour Regular flour works best for this recipe.
- 1.5 cups Warm water Temperature should be between 110°F and 120°F.
- 2 teaspoons Instant dry yeast No activation needed.
- 2 teaspoons Salt Use to taste.
- 1 tablespoon Sugar Optional for additional flavor.
For Greasing
- 1 tablespoon Olive oil For greasing the bowl.
Instructions
Preparation
- Gather your ingredients: all-purpose flour, instant yeast, salt, sugar, and warm water.
- In a large bowl or stand mixer, combine 4 cups of all-purpose flour, 2 teaspoons of instant yeast, 2 teaspoons of salt, and 1 tablespoon of sugar.
- Gradually add 1 ½ cups of warm water while mixing to create a sticky dough.
- Knead the dough on a floured surface for 8-10 minutes, or use the dough hook attachment on your mixer for 5-7 minutes until smooth and elastic.
- Place the kneaded dough in a lightly greased bowl, cover it with a damp cloth, and let it rise in a warm, draft-free area for 20 minutes.
- After the first rise, punch the dough down to release air and shape it into a loaf on a floured surface.
- Transfer the shaped dough into a greased loaf pan and allow it to rise for another 15 minutes.
- Preheat your oven to 425°F while the dough is rising.
- Once risen, place the loaf in the preheated oven and bake for 25-30 minutes until golden brown and crusty.
- Remove from the oven, let it cool in the pan for a few minutes, then transfer to a wire rack.