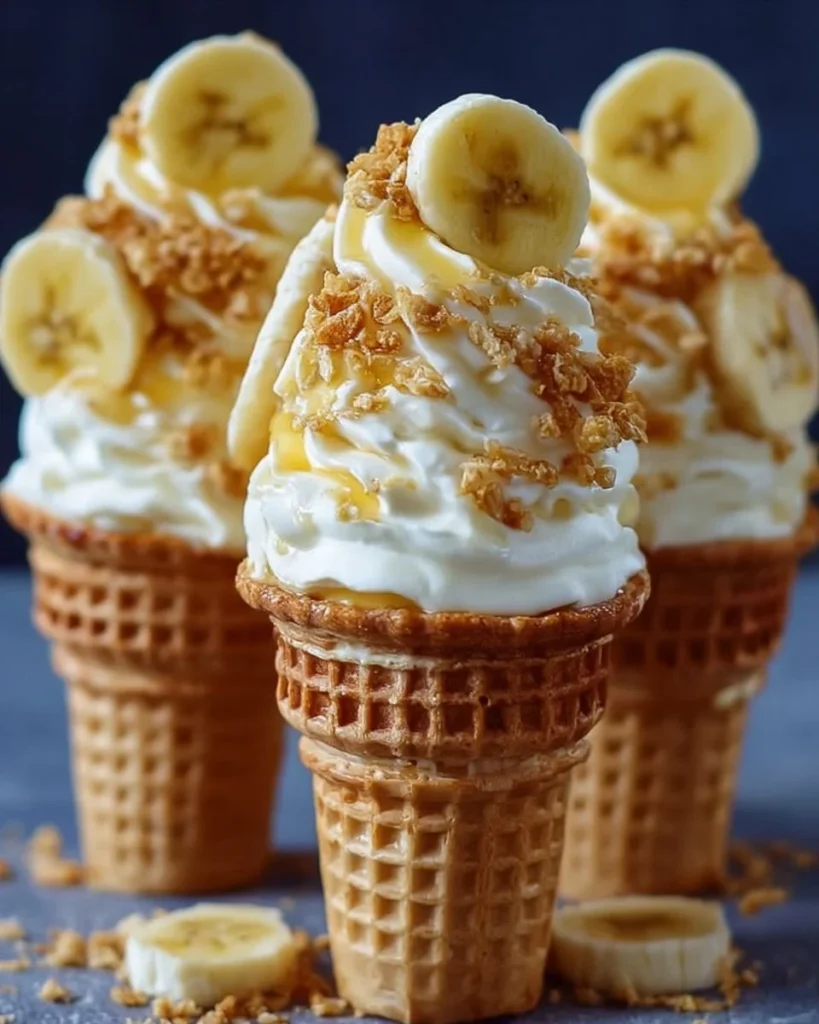
Banana Pudding Cheesecake Cones with a Crunchy Twist are a fun and delicious dessert that combines the classic flavors of banana pudding and cheesecake in a portable cone format. These treats are perfect for parties, picnics, or just a sweet snack at home. The crunchy bottom adds a delightful texture, making each bite even more enjoyable!
Why Make This Recipe
This recipe stands out because it’s easy to make and allows for creativity. You can customize it with optional toppings like crushed Doritos or cinnamon sugar, giving each cone a unique twist. Plus, they are perfect for sharing with friends and family, making them an ideal choice for gatherings.
How to Make Banana Pudding Cheesecake Cones
Making these Banana Pudding Cheesecake Cones is straightforward and fun! Just follow these simple steps to create your own delicious cones.
Ingredients
- 2 (8 oz) packages cream cheese, softened
- 1/2 cup powdered sugar
- 1 cup heavy cream
- 1 teaspoon vanilla extract
- 1/2 cup mashed ripe banana
- 1/2 cup shredded coconut (optional)
- 6 sugar cones (or waffle cones)
- 1/2 cup crushed vanilla wafers
- 1/4 cup melted butter
- 1/2 cup mini chocolate chips (optional)
- 1/2 cup sliced bananas (fresh)
- Whipped cream
- Crushed Doritos or Cinnamon Sugar (optional)
Directions
Prepare the filling: In a large bowl, beat the softened cream cheese and powdered sugar until smooth. Add the heavy cream, vanilla extract, and mashed banana. Continue beating until the mixture is light and creamy. If using, fold in shredded coconut for extra tropical flavor.
Prepare the cones: Mix the crushed vanilla wafers with melted butter. Press this mixture into the bottom of each sugar cone to form a crunchy base.
Fill the cones: Spoon the banana pudding cheesecake filling into the cones, layering it on top of the vanilla wafer base. Be generous with the filling to create a thick, creamy dessert.
Top the cones: Add fresh banana slices on top of each cone, followed by a dollop of whipped cream. For extra fun, sprinkle with crushed Doritos (for a savory twist) or cinnamon sugar for added flavor.
Serve: Place the cones in the fridge for at least 1 hour to set the filling before serving.
How to Serve Banana Pudding Cheesecake Cones
These cones can be served directly from the fridge after they have set. Place them upright in a container or on a platter for easy serving. You can also add extra toppings just before serving for a fresh look.
How to Store Banana Pudding Cheesecake Cones
To store these cones, keep them in the refrigerator covered with plastic wrap. They are best enjoyed within 2-3 days for the freshest taste. Avoid storing them too long as the cones may get soggy.
Tips to Make Banana Pudding Cheesecake Cones
- Use very ripe bananas for a sweeter flavor.
- If you want an extra crunch, add some chopped nuts to the filling or as a topping.
- Feel free to mix and match toppings based on your preferences.
Variation
Try adding different fruits like strawberries or blueberries for a fruity twist. You can also experiment with different flavored extracts, such as almond or coconut, for unique flavor profiles.
FAQs
1. Can I use low-fat cream cheese for this recipe?
Yes, you can use low-fat cream cheese if you want a lighter version of the cheesecake filling.
2. How can I make these cones gluten-free?
Look for gluten-free sugar cones and ensure that the vanilla wafers you use are gluten-free as well.
3. Can I prepare these cones in advance?
Yes, you can prepare the filling and fill the cones a day in advance, but it’s best to add the whipped cream and fresh banana slices just before serving.

Banana Pudding Cheesecake Cones
Ingredients
Filling Ingredients
- 2 packages 8 oz cream cheese, softened
- 0.5 cup powdered sugar
- 1 cup heavy cream
- 1 teaspoon vanilla extract
- 0.5 cup mashed ripe banana Use very ripe bananas for a sweeter flavor.
- 0.5 cup shredded coconut (optional) For an extra tropical flavor.
Cone Ingredients
- 6 pieces sugar cones (or waffle cones)
- 0.5 cup crushed vanilla wafers
- 0.25 cup melted butter
- 0.5 cup mini chocolate chips (optional)
- 0.5 cup sliced bananas (fresh)
- whipped cream
- crushed Doritos or cinnamon sugar (optional) For extra flavor.
Instructions
Preparation
- In a large bowl, beat the softened cream cheese and powdered sugar until smooth.
- Add the heavy cream, vanilla extract, and mashed banana. Continue beating until the mixture is light and creamy.
- If using, fold in shredded coconut for extra tropical flavor.
Prepare the Cones
- Mix the crushed vanilla wafers with melted butter.
- Press this mixture into the bottom of each sugar cone to form a crunchy base.
Fill the Cones
- Spoon the banana pudding cheesecake filling into the cones, layering it on top of the vanilla wafer base.
- Be generous with the filling to create a thick, creamy dessert.
Top the Cones
- Add fresh banana slices on top of each cone, followed by a dollop of whipped cream.
- For extra fun, sprinkle with crushed Doritos or cinnamon sugar.
Serve
- Place the cones in the fridge for at least 1 hour to set the filling before serving.