Imagine the comforting aroma of freshly baked bread filling your home. It brings back memories of family gatherings and warm meals. Now, what if I told you that you can make this warmth in just 20 minutes?
With this easy bread dough recipe, homemade bread is within reach without long hours. Forget the intimidation of traditional recipes that take hours to prepare and knead. Instead, enjoy a quick and simple method that fits your busy life.
Once you make your own homemade bread dough, you’ll wonder how you ever lived without it!
Key Takeaways
- This easy bread dough can be made in just 20 minutes.
- Homemade bread dough offers a comforting experience.
- The quick bread method minimizes preparation time.
- Freshly baked bread enhances any meal.
- You can create a variety of breads with this basic dough.
Introduction to Homemade Bread Dough
Making homemade bread can bring joy to your kitchen. The aroma of fresh bread makes your home inviting. Enjoying warm, soft bread straight from the oven is delightful.
With this easy 20-minute dough, you get convenience and wholesome goodness. It’s perfect for both seasoned bakers and beginners. This recipe lets you explore different flavors and textures, making cooking more rewarding.

Why Choose Quick Bread Recipes?
Quick bread recipes are a great way to enjoy fresh bread without waiting long. They are quick and easy to make, perfect for saving time in the kitchen. You can make a delicious loaf or muffins fast with just a few ingredients.
Quick breads are easy because they don’t need yeast. Instead, they use baking powder or baking soda. This means you don’t have to wait for them to rise for hours. It’s great for busy people or those new to baking.
Looking into easy bread recipes shows they often turn out well. Quick breads are simple to make, letting you try different flavors and textures. This makes them perfect for anyone who loves to get creative in the kitchen.

Essential Ingredients for Your Bread Dough
Making delicious homemade bread starts with the right ingredients. The choice of flours and yeast greatly affects the taste and texture of your loaf. We’ll look at the differences between flours and why instant yeast is key for perfect bread.
Flours: Bread Flour vs. Whole Wheat Flour
When picking flour for your dough, you have bread flour and whole wheat flour. Each has its own special qualities that shape your bread’s taste and texture.
| Type of Flour | Texture | Protein Content | Flavor |
|---|---|---|---|
| Bread Flour | Chewy and lofty | 12-14% | Neutral, enhances added flavors |
| Whole Wheat Flour | Nutty and dense | 13-15% | Rich, slightly sweet |
Bread flour makes your bread chewy and lofty. On the other hand, whole wheat flour gives a denser loaf with a nuttier taste. It’s perfect for those who care about health.
The Role of Instant Yeast in Bread Making
Instant yeast makes bread making quicker. Unlike active dry yeast, it doesn’t need to be proofed. You can mix it straight with the flour.
This yeast ferments fast without losing flavor. It makes your dough rise quicker, leading to soft, airy loaves. Keep your instant yeast cool and dry to keep it effective.
Step-by-Step Guide to Making Bread Dough
Making bread dough is a fun and rewarding process. Follow this simple recipe to make a tasty base for many baked goods.
First, gather your ingredients. You’ll need:
- 2 ¼ teaspoons of instant yeast
- 1 tablespoon of sugar
- 1 tablespoon of olive oil
- 1 cup of warm water (about 110°F)
- 3 cups of all-purpose flour
- 1 teaspoon of salt
Start by mixing yeast, sugar, olive oil, and warm water in a big bowl. Let it sit for five minutes until it gets frothy. This step makes sure your yeast is working well.
Then, mix flour and salt in another bowl. Slowly add this dry mix to the yeast mixture, stirring until it starts to form a dough.
Now, knead the dough. Put it on a floured surface. Knead for 8-10 minutes, using firm pressure. You want it smooth and elastic. If it’s too sticky, add a bit more flour.
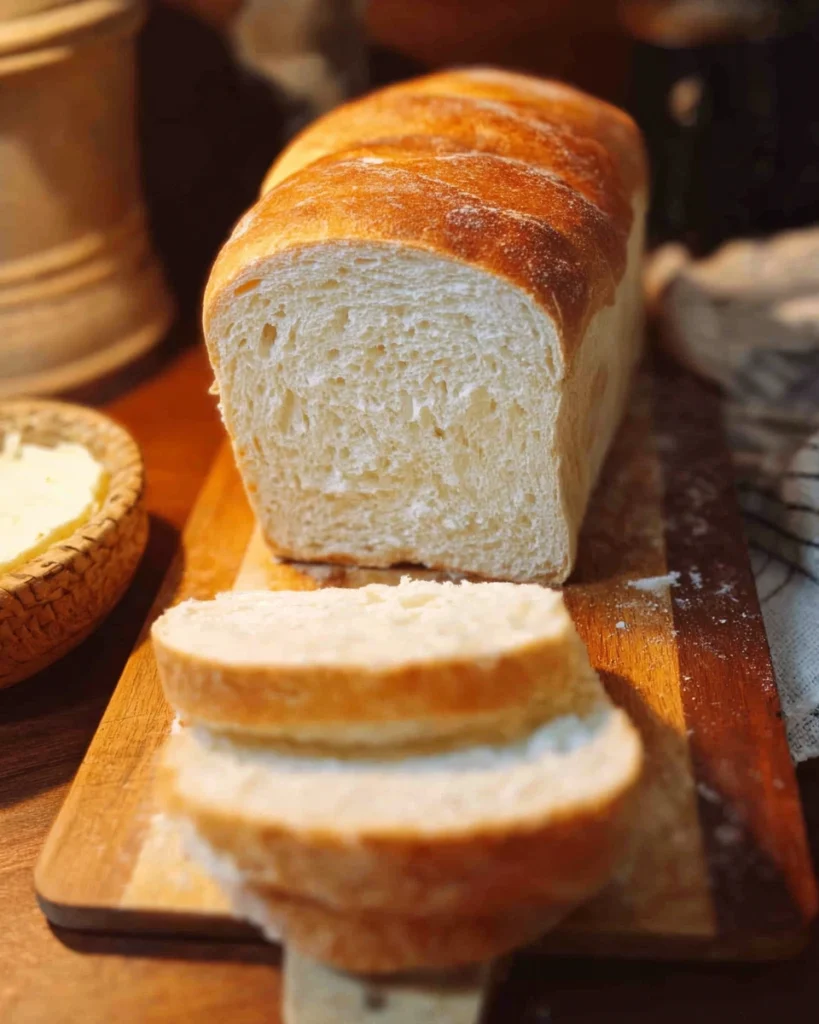
After kneading, shape the dough into a ball. Put it in a greased bowl. Cover it with a damp cloth or plastic wrap. Let it rise in a warm place for about an hour, or until it doubles in size. This step makes your bread light and airy.
Once it’s risen, gently punch it down to get rid of air. Now, you can shape it into loaves, rolls, or pizza crusts. Let it rest a bit before baking to improve its texture.
With this easy recipe, making bread at home is simple and rewarding. Start making your delicious breads today!
Using Your Bread Dough: Creative Ideas
Your homemade bread dough is a gateway to endless culinary adventures. With a few simple steps, you can make delicious soft dinner rolls or a tasty pizza crust. These homemade bread options add flavor to your meals and let you try new tastes and fillings.
Turning Dough into Soft Dinner Rolls
Soft dinner rolls are great for family dinners or cozy nights in. Start by dividing your dough into small pieces. Roll each into a ball and place them on a greased baking sheet, leaving space for them to rise. Brush the tops with melted butter for extra flavor. A recipe for dinner rolls can help you get that fluffy texture.
Shaping Dough for Pizza Crust
Craving pizza? Your bread dough can be shaped into a fantastic pizza crust. Let it rise, then roll it out to your liking. Choose a thin, crispy crust or a thicker one, based on your taste. Add your favorite sauce, cheese, and toppings before baking until it’s golden and bubbly. This dough is versatile for many pizza styles, from classic pepperoni to gourmet.
Don’t be afraid to try new things with your dinner rolls and pizza crusts. You could fill your rolls with herbs or cheese, or make stuffed pizzas like calzones or bacon cheeseburger roll-ups. With your homemade bread, the possibilities are endless!
Storage Tips for Homemade Bread Dough
Storing bread dough right is key to keeping it fresh and tasty. This guide helps you store dough for both short and long times. By using these tips, you can enjoy homemade bread any time, even on busy days.
Keeping Dough Fresh
For short-term storage, it’s easy to keep dough fresh. Put your dough in an airtight container to stop it from drying out. Make sure the lid is tight but not too tight, so the dough can expand.
Store it at room temperature for up to two hours. If you need to keep it longer, refrigerate it for up to three days. Just let it come to room temperature before shaping.
Freezing Bread Dough for Later Use
Freezing dough is a smart way to have it ready when you need it. Start by gently shaping your dough into a ball. Wrap it tightly in plastic wrap, making sure there are no gaps, then put it in a freezer bag.
Label the bag with the date and type of dough. This way, you can keep track of how long it’s been stored. Frozen dough can last up to three months. When you’re ready to bake, thaw it in the fridge overnight before letting it rise again.
| Storage Method | Duration | Notes |
|---|---|---|
| Room Temperature | Up to 2 hours | Perfect for immediate baking |
| Refrigerator | Up to 3 days | Let reach room temperature before baking |
| Freezer | Up to 3 months | Thaw in the fridge overnight before use |
Advantages of Homemade Bread Over Store-Bought
Homemade bread has many benefits that make it better than store-bought. One big plus is its freshness. Baking at home means you get bread that’s warm and smells amazing. This makes meals more enjoyable.
When it comes to taste, homemade bread wins. You can pick the ingredients, making it taste better than store-bought. Plus, you avoid preservatives and artificial stuff found in many commercial breads.
Homemade bread is also cheaper. Artisan bread in stores is pricey. But, making it at home saves money. This is great for families or anyone who loves bread.
Lastly, making your own bread lets you choose what goes into it. Want whole grains or gluten-free? You can do it. This shows how making your own bread is healthier and more flexible.
| Feature | Homemade Bread | Store-Bought Bread |
|---|---|---|
| Freshness | Warm and fresh from the oven | Often stale by the time of purchase |
| Taste | Customized flavors and natural ingredients | Standardized taste and additives |
| Cost | Lower cost for high-quality results | Higher prices for premium options |
| Ingredient Control | Full control over quality and choices | Limited options with preservatives |
Baking Time and Temperature for Perfect Bread
To bake bread perfectly, you need to know the right baking time and temperature. The ideal temperature is about 375°F (190°C). This ensures your loaf rises well and gets a golden crust. Each bread type has its own baking needs, which can greatly improve your baking.
Here’s a quick guide to help you bake. It covers common bread types, their baking times, and the best temperatures:
| Type of Bread | Baking Time | Perfect Bread Temperature |
|---|---|---|
| White Bread | 25-30 minutes | 375°F (190°C) |
| Whole Wheat Bread | 30-35 minutes | 375°F (190°C) |
| Pizza Dough | 12-15 minutes | 450°F (232°C) |
| Rustic Artisan Bread | 30-35 minutes | 450°F (232°C) |
Signs Your Bread is Done Baking
Knowing when your bread is done is as important as knowing the baking time. Look out for these signs:
- The crust turns a rich, golden brown.
- It emits a lovely, toasty aroma.
- When tapped on the bottom, it sounds hollow.
- The bread’s internal temperature reaches approximately 190°F (88°C).
With the right baking time and knowing when it’s done, you can make delicious bread every time. Enjoy the joy of baking at home!
Additional Variations and Flavors for Your Dough
Try new flavors in your homemade bread to turn it into a masterpiece. Adding unique ingredients can make your bread exciting. Mix in fresh herbs like rosemary or thyme for a fragrant touch.
Spices are great for creativity. A bit of garlic powder or paprika makes a savory bread. It’s perfect with soups and salads. Try adding cheeses like cheddar or feta for a rich taste. Nuts and seeds, like walnuts or sunflower seeds, add flavor and crunch.
Looking for more ideas? Check out this guide on creative bread recipes. Add olives or sun-dried tomatoes for a Mediterranean twist. Or, try raisins or cinnamon for a sweet breakfast bread.
Experimenting with flavors lets you make your bread your own. It’s a fun and rewarding way to bake.
Conclusion
Making homemade bread is more than just a meal. It brings joy and satisfaction to your day. With simple recipes, you can make a delicious loaf in just 20 minutes. This saves you hours in the kitchen and makes cooking a fun experience.
The joy of baking your own bread is unmatched. The smell of fresh bread in your kitchen makes any meal special. Plus, you can try new flavors and textures, making each loaf unique. Whether it’s savory focaccia or sweet cinnamon rolls, you can experiment endlessly.
Start your baking journey with this easy recipe. Making your own bread is not only healthy but also connects you to your food. Every slice of homemade bread brings warmth and satisfaction, reminding you of the joy of creating something yourself.
FAQ
How long does it take to make homemade bread dough?
Making homemade bread dough takes just 20 minutes. It’s quick and easy for those with busy schedules.
What ingredients do I need for simple bread dough?
You’ll need flour, yeast, water, sugar, olive oil, and salt. Use bread flour or whole wheat for different tastes.
How do I know if my bread is baked properly?
Check if your bread has a golden crust and sounds hollow when tapped. The internal temperature should be about 190°F (88°C).
Can I freeze homemade bread dough?
Yes! Freeze your dough for later. Wrap it in plastic wrap, label it, and store it in the freezer for freshness.
What’s the difference between bread flour and whole wheat flour?
Bread flour has more protein for a better rise and chewy texture. Whole wheat flour is denser and more nutritious.
What are quick breads, and how do they differ from traditional bread?
Quick breads use baking powder or baking soda for a fast rise. They’re perfect for quick treats without yeast.
How can I customize my bread dough for different flavors?
Add herbs, spices, cheeses, or nuts to your dough for unique flavors. Rosemary or garlic can make a big difference.
What are some creative uses for my homemade bread dough?
Use your dough for dinner rolls, pizza crusts, bacon cheeseburger roll-ups, and calzones. It’s great for many dishes.
Why is homemade bread healthier than store-bought options?
Homemade bread lets you choose healthy ingredients like whole grains or organic options. It avoids preservatives found in store-bought bread.
What are some tips for kneading dough effectively?
Make your dough smooth and elastic by kneading it right. Press and fold the dough, and adjust the flour if it’s too sticky.
Homemade Bread Dough
Ingredients
Dough Ingredients
- 2 ¼ teaspoons instant yeast Use instant yeast for quicker results.
- 1 tablespoon sugar Enhances yeast activity.
- 1 tablespoon olive oil Adds moisture and flavor.
- 1 cup warm water Around 110°F to activate yeast.
- 3 cups all-purpose flour You can substitute with bread flour.
- 1 teaspoon salt Enhances flavor.
Instructions
Preparation
- In a large bowl, mix yeast, sugar, olive oil, and warm water. Let sit for 5 minutes until frothy.
- In another bowl, combine flour and salt. Gradually add this dry mix to the yeast mixture, stirring until dough forms.
- Turn the dough onto a floured surface and knead for 8-10 minutes until smooth and elastic. If sticky, add a bit more flour.
- Shape the dough into a ball and place it in a greased bowl. Cover with a damp cloth and let rise in a warm place for about 1 hour or until doubled in size.
- Once risen, gently punch down to release air. Shape the dough into desired forms (loaves, rolls, or pizza crusts) and let rest.