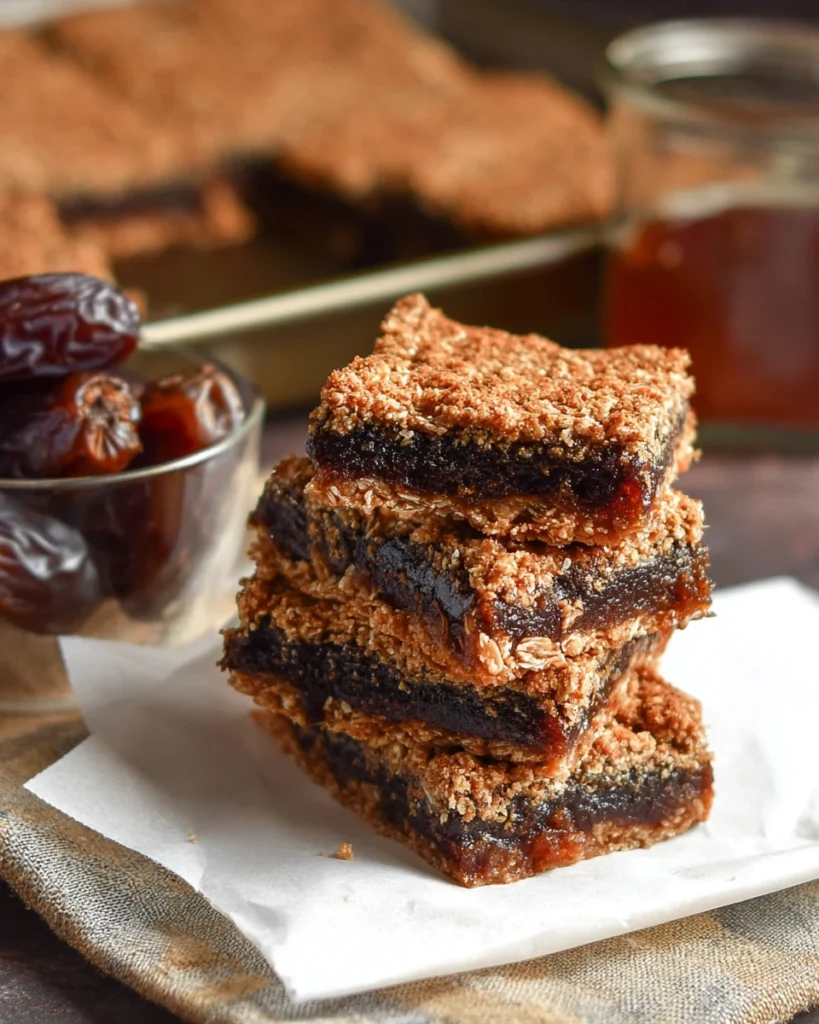
Imagine a cozy afternoon with the smell of baking and a warm cup of tea. Classic date bars bring warmth and nostalgia like few desserts can. They have a chewy texture, hearty oats, and a sweet burst of dates.
These homemade date bars are more than just a treat. They’re a reminder of simple pleasures. Whether you want to satisfy your sweet tooth or share a memory, classic date bars are perfect. Let’s explore the world of date bars and see how easy they are to make at home.
Key Takeaways
- Classic date bars are known for their chewy texture and rich flavors.
- These homemade date bars combine dates with oats and a buttery crust.
- They’re a healthier dessert option that satisfies your sweet cravings.
- Making date bars at home is an easy and enjoyable process.
- Classic date bars are perfect for sharing or enjoying alone.
- They evoke feelings of warmth and nostalgia, making any gathering special.
Introduction to Classic Date Bars
Welcome to the world of classic date bars! These treats have won many hearts, becoming a go-to for any event. They’re perfect for a quick snack, a sweet dessert, or a dish for a potluck.
Classic date bars are made with wholesome ingredients. They offer a healthier choice compared to processed sweets. The dates add a rich flavor, balancing taste and nutrition. Trying a date bars recipe lets you enjoy a satisfying treat that’s also good for you.

When you make your own batch, you’ll love mixing flavors and textures. Classic date bars are not just healthy; they also spark creativity in the kitchen. They’re a great choice for a snack that’s good for you and your loved ones.
What Are Date Bars?
Date bars are a tasty treat made from wholesome ingredients. They have a crunchy crust and a sweet, chewy filling. You can change the texture and sweetness to fit your taste.
These bars are great for a quick energy boost. They’re full of fiber and nutrients. They’re a healthy choice instead of processed snacks.

History of Date Bars
The history of date bars goes back to the Middle East, where dates are a staple. Ancient cultures loved dates for their sweetness and health benefits. They were the first to use them in recipes, starting the journey of date bars.
When dates traveled to the West, they got a new twist with oats and butter. This turned simple date slices into a favorite dessert. Over time, bakers added nuts, spices, and even chocolate, creating many new recipes.
Today, date bars are a mix of flavors and cultures, loved by many. Their journey from ancient times to now shows their enduring appeal. This dessert continues to evolve, reminding us of its timeless charm.
Ingredients for Classic Date Bars
To make the perfect classic date bars, you need the right mix of ingredients. These ingredients create amazing flavors and textures. We’ll look at the base ingredients and the date filling separately.
Base Ingredients
The key parts of your classic date bars recipe are:
- Real butter
- Light brown sugar
- All-purpose flour
- Quick or old-fashioned oats
- Baking soda
- Salt
Together, these ingredients make a crust that’s both strong and soft. It’s the perfect base for your date bars.
Date Filling Ingredients
The filling of your date bars includes:
- Chopped pitted dates
- Sugar
- Water
This filling is cooked until it’s thick. It adds sweetness and makes the bars chewy.
Step-by-Step Date Bars Recipe
Making delicious date bars is easy with a few simple steps. This guide will show you how to make the crust, the date filling, and how to bake them perfectly.
Preparing the Crust
First, heat your oven to 350°F (175°C). Mix flour, oats, and a bit of salt in a bowl. Then, add softened butter and mix until it’s crumbly. Spread half of this mixture in a greased pan.
Making the Date Filling
Next, mix chopped dates, sugar, and water in a saucepan. Cook over medium heat, stirring often, until it thickens. Spread this gooey filling over the crust in the pan.
Baking Techniques
Now, sprinkle the rest of the crust mixture on top of the filling. Bake for 25-30 minutes until the top is golden. Let the bars cool in the pan before cutting them into squares for the best texture.
| Step | Action |
|---|---|
| 1 | Preheat oven to 350°F (175°C). |
| 2 | Mix dry ingredients with softened butter. |
| 3 | Spread half of the crust mixture in a pan. |
| 4 | Combine dates, sugar, and water in a saucepan. |
| 5 | Cook until thick and spread over crust. |
| 6 | Crumble remaining crust over date filling. |
| 7 | Bake for 25-30 minutes until golden brown. |
| 8 | Cool completely before cutting into squares. |
Why You Should Love Date Bars
Date bars are a tasty and nutritious snack. They are packed with fiber, vitamins, and minerals. This makes them a great energy source for busy days.
They keep you full and satisfied. Unlike processed snacks, date bars don’t cause energy crashes. This is why they’re a healthier choice.
The natural sweetness of dates lets you enjoy a sweet treat while eating well. You can mix them with nuts, seeds, or oatmeal. This boosts their nutritional value even more.
Adding date bars to your snacks is good for your health. They satisfy your cravings and support a healthier lifestyle. Enjoy the benefits of date bars with every bite.
Variations of Date Bar Recipes
Date bars are fun to make and can be made in many ways. You can try different ingredients to change the taste and texture. Each new version brings a fresh twist to the classic recipe, meeting different tastes and dietary needs.
Oatmeal Date Bars Recipe
This version uses oatmeal for both the crust and topping. The oatmeal date bars recipe adds a nice chewiness and texture contrast. It’s a healthy and tasty snack, great for breakfast or a midday treat.
Healthy Date Bars Options
It’s easy to make healthier date bars. You can swap out ingredients like almond flour or cut down on sugar. These changes keep the bars delicious while fitting your health goals.
Date Cake Bars
If you want something more indulgent, try date cake bars. They mix the richness of cake with the classic date bar. Adding eggs makes them moist and flavorful, like a cake but with the date bar’s essence.
Storage Tips for Date Bars
To keep your date bars fresh, use the right storage methods. Store them in an airtight container at room temperature. This keeps them fresh for up to five days, so you can enjoy every bite.
If you need to store them longer, freezing is a great choice. Wrap each bar in plastic wrap and put them in a zip-lock bag. Then, store them in the freezer. This way, you avoid freezer burn and can enjoy them for months.
For more tips on storing dates, check out this resource on storage tips for dates. Proper storage not only keeps the flavor but also lets you enjoy them longer. This way, you can savor your treats without worrying about their quality.
| Storage Method | Duration | Notes |
|---|---|---|
| Airtight Container (Room Temperature) | Up to 5 Days | Ideal for short-term consumption |
| Freezer (Wrapped Individually) | Up to 3 Months | Prevents freezer burn, best for longer storage |
Date Bars Serving Suggestions
Date bars are super versatile and can be enjoyed in many ways. Serving them plain makes for a healthy snack. For a richer treat, try adding vanilla ice cream or drizzling chocolate sauce on top. This adds a special touch to your dessert.
Another great idea is to serve them with coffee or tea. The nutty flavors of the date bars go well with both drinks. It’s a perfect snack for a cozy afternoon. You can also share them at parties by cutting them into small squares. This way, everyone gets a little piece of dessert.
For a fun presentation, put date bars on a platter with fruits, nuts, and dips. Mixing different items creates a colorful and tasty display. It shows off the date bars and adds to the fun. Remember, how you serve date bars can make them even more enjoyable.
| Serving Style | Description |
|---|---|
| Plain | Enjoy with no toppings for a simple yet satisfying snack. |
| With Ice Cream | Top with a scoop of vanilla ice cream for indulgent enjoyment. |
| With Chocolate Sauce | Drizzle chocolate sauce for a meaningful dessert twist. |
| With Coffee or Tea | Pair with hot beverages for a pleasant afternoon treat. |
| At Gatherings | Cut into small squares for easy sharing among guests. |
| Festive Platter | Arrange with fresh fruits and nuts for a colorful display. |
Conclusion
Classic date bars are more than a tasty treat. They mix old-time charm with health benefits, making them perfect for any event. Their long history and easy-to-make recipe let you try new flavors. They’re great for a solo snack or to share with friends.
These bars taste amazing and are good for you, too. They’re a smart choice for desserts because of their nutritious ingredients. Their texture and health benefits make them a beloved classic.
Looking for a sweet, healthy dessert? Remember classic date bars. Their mix of flavors and health perks will have everyone wanting more!
FAQ
What are classic date bars?
Classic date bars are tasty treats made from oats, butter, and dates. They have a chewy texture and rich flavors. They’re a great choice for a dessert or snack.
How do I prepare the crust for date bars?
First, preheat your oven. Then, mix dry ingredients with butter until it’s crumbly. Spread half of this mixture in a baking pan, then add the date filling.
What variations can I make to the date bars recipe?
You can make oatmeal date bars for extra texture. Or, try healthy date bars with almond flour or less sugar. Date cake bars are also an option, with eggs for a cakey feel.
How should I store date bars?
Keep your date bars in an airtight container at room temperature for up to 5 days. You can also freeze them, wrapped individually, for longer storage.
Are date bars healthy?
Yes, date bars are full of fiber, vitamins, and minerals. They offer natural sweetness from dates. They’re a healthier choice than processed sugary snacks.
Can I use different types of oats in my date bars recipe?
Definitely! You can use quick oats or old-fashioned oats. It depends on the texture you prefer for the crust and topping.
What are some serving suggestions for date bars?
Enjoy date bars plain, with ice cream, or drizzled with chocolate sauce. They’re perfect with coffee or tea for a treat. They’re also great as a dessert at gatherings.
Classic Date Bars
Ingredients
For the Crust
- 1 cup Real butter, softened
- 1 cup Light brown sugar
- 1.5 cups All-purpose flour
- 1 cup Quick or old-fashioned oats
- 1 teaspoon Baking soda
- 0.5 teaspoon Salt
For the Date Filling
- 2 cups Chopped pitted dates
- 0.5 cup Sugar
- 1 cup Water
Instructions
Preparation
- Preheat oven to 350°F (175°C).
- Mix flour, oats, and salt in a bowl. Add softened butter and mix until crumbly.
- Spread half of this mixture in a greased pan.
Making the Date Filling
- Mix chopped dates, sugar, and water in a saucepan.
- Cook over medium heat, stirring often, until it thickens.
- Spread this filling over the crust in the pan.
Baking
- Sprinkle the remaining crust mixture on top of the filling.
- Bake for 25-30 minutes until the top is golden.
- Let the bars cool in the pan before cutting them into squares.